
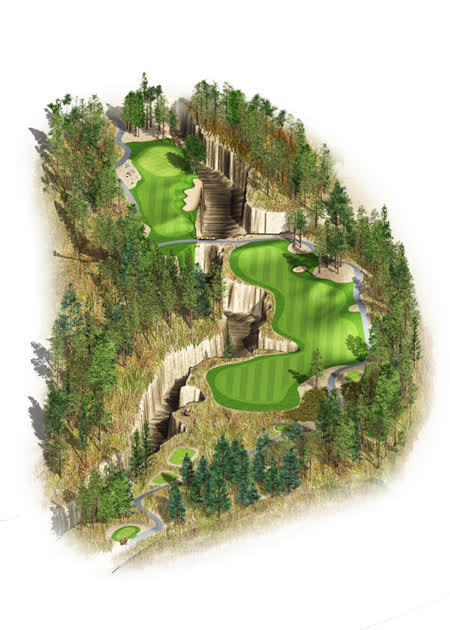
Course Tour
Hole 1 Par 5 |
“A Matter Of Honor” |
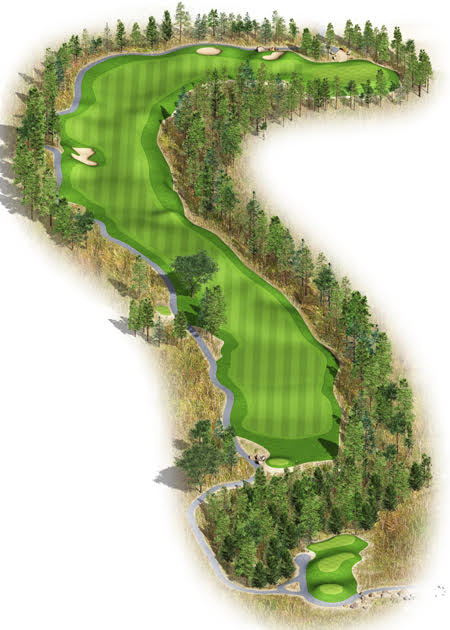 The scenic opening hole, a true three-shot Par 5, meanders through a row of thick trees toward the Capitan Mountains. The preferred tee shot hugs the left side of the fairway, setting up a second shot just past the left side fairway bunker. With little more than a short iron, three good shots should have you safely on the green. The scenic opening hole, a true three-shot Par 5, meanders through a row of thick trees toward the Capitan Mountains. The preferred tee shot hugs the left side of the fairway, setting up a second shot just past the left side fairway bunker. With little more than a short iron, three good shots should have you safely on the green.Click the image to enlarge |
|
Hole 2 Par 5 |
“Battle Of Bear Paw” |
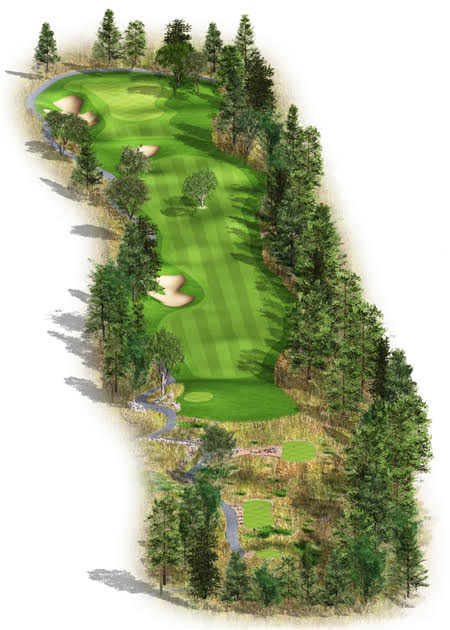 A unique back-to-back par 5 start, the second hole gives players a chance to score. This straight-away shorter hole requires a drive favoring the left side of the fairway. If this is achieved, the second shot can be an iron into a deep, two-tiered green sloping back to front. Beware of the pot bunker 40 yards short and in front of the green. A unique back-to-back par 5 start, the second hole gives players a chance to score. This straight-away shorter hole requires a drive favoring the left side of the fairway. If this is achieved, the second shot can be an iron into a deep, two-tiered green sloping back to front. Beware of the pot bunker 40 yards short and in front of the green.Click the image to enlarge
|
|
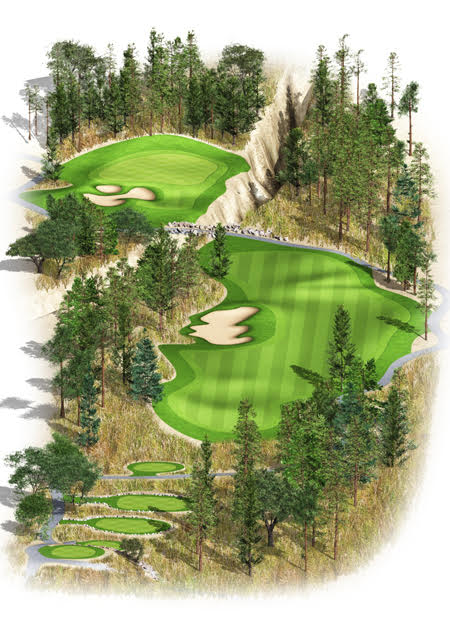
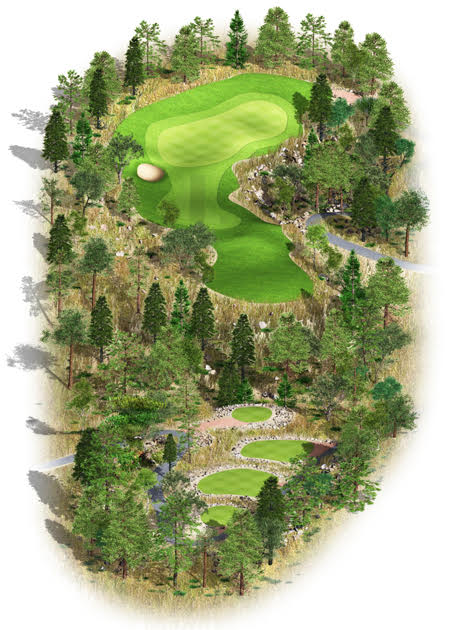
Hole 3 Par 3 |
“Eye Of The Raven” |
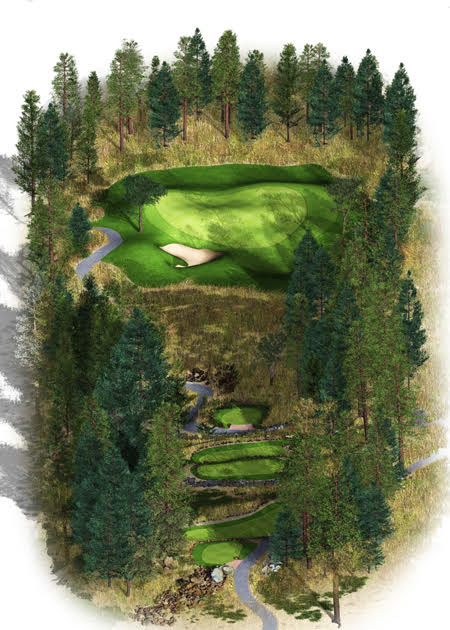 After two Par 5’s comes a challenging Par 3 that drops 80 feet from tee to green. With just as much danger long as there is short, it’s all about club selection and playing it safe to the middle of the green. The altitude of the tee box suggests 1 to 2 fewer clubs. The views here are extraordinary, out and across a verdant valley with Sierra Blanca to the west. After two Par 5’s comes a challenging Par 3 that drops 80 feet from tee to green. With just as much danger long as there is short, it’s all about club selection and playing it safe to the middle of the green. The altitude of the tee box suggests 1 to 2 fewer clubs. The views here are extraordinary, out and across a verdant valley with Sierra Blanca to the west.Click the image to enlarge
|
|
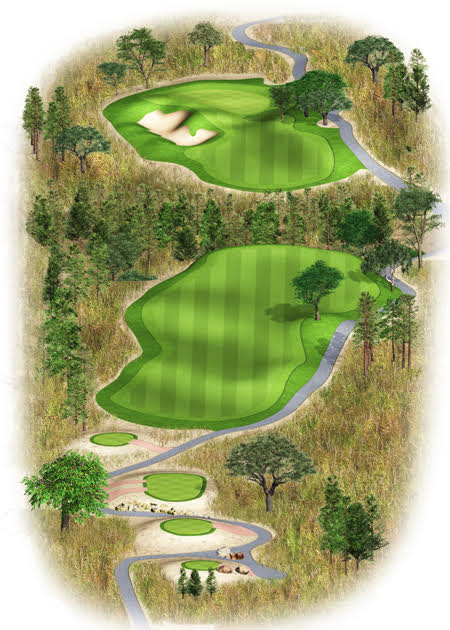
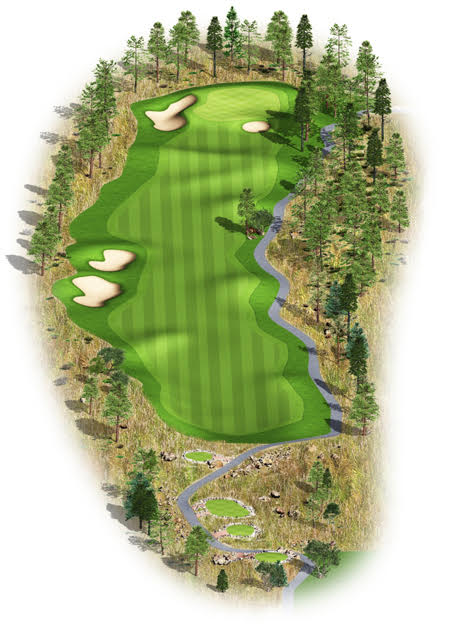
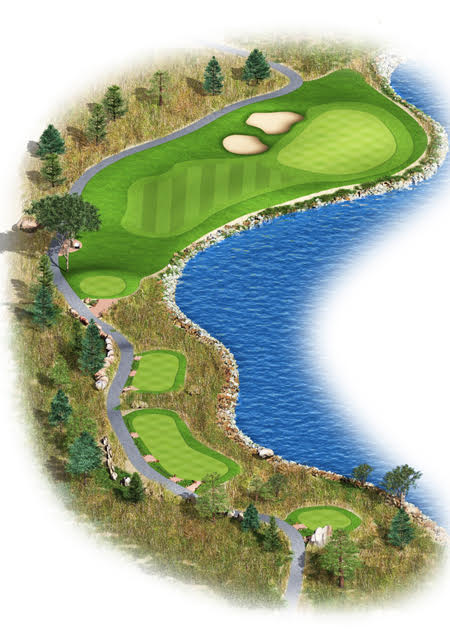
Hole 4 Par 4 |
“Battle of Two Hearts” |
 This demanding Par 4 requires two strategically placed shots. The first should favor the left side of the fairway so you have an unobstructed view of the green. As you prepare to turn the corner of a severe dogleg right, do not take direct aim at the flagstick, as the green sits on a plateau framed by greenside bunkers protecting its right side. Getting away with par is a true feat. Take it and run to the next tee. This demanding Par 4 requires two strategically placed shots. The first should favor the left side of the fairway so you have an unobstructed view of the green. As you prepare to turn the corner of a severe dogleg right, do not take direct aim at the flagstick, as the green sits on a plateau framed by greenside bunkers protecting its right side. Getting away with par is a true feat. Take it and run to the next tee.Click the image to enlarge
|
|
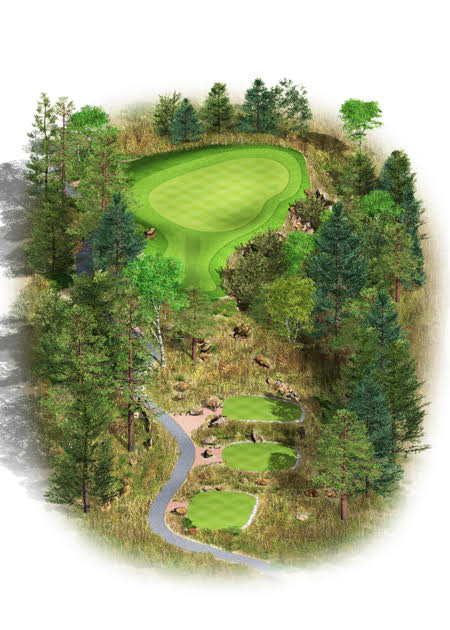
Hole 5 Par 4 |
“Emergence Of The Chief” |
 The fifth hole favors accuracy over distance. With danger to the left, a tee shot past the lone tree on the right side of the fairway is ideal. If anything, your high iron approach shot to an elevated green should miss long and right. You might be fortunate to get a kick back onto the green from the backstop. The fifth hole favors accuracy over distance. With danger to the left, a tee shot past the lone tree on the right side of the fairway is ideal. If anything, your high iron approach shot to an elevated green should miss long and right. You might be fortunate to get a kick back onto the green from the backstop.Click the image to enlarge
|
|
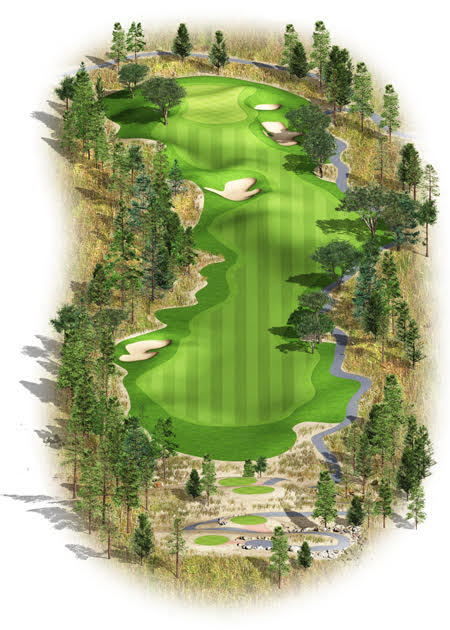
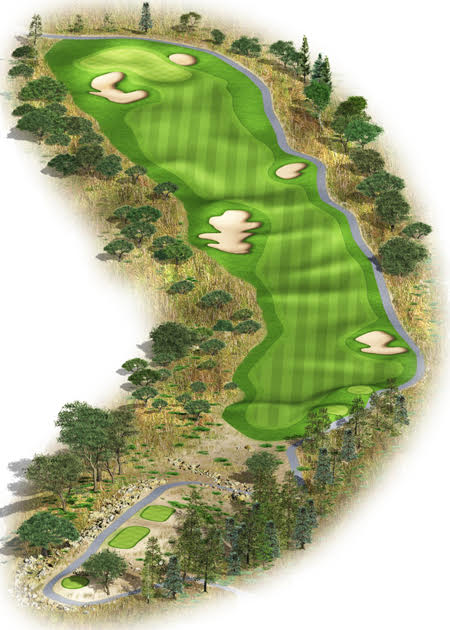
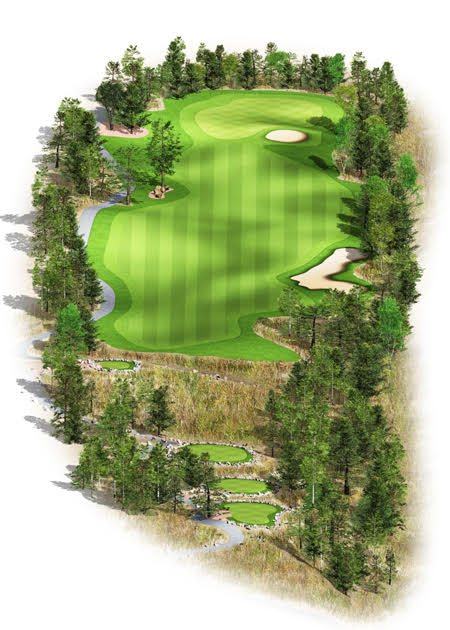
Hole 6 Par 4 |
“Strong Hearts” |
 This is the #1 handicap hole, and for good reason. The fairway ahead slopes strongly right to left. Take aim at the sloping hills that border the fairway right or, for those who prefer a fade, start shaping your shot from the rock on the left side of the fairway. You will be hitting uphill to a well-protected green where there is a rock cropping to the left, an arroyo that creeps along the right side of the green, and, for good measure, a bunker just short and right. The approach tends to play a little longer than marked. If you’re lucky enough to find yourself on in two, well, a tricky undulating green is anything but security for par. This is the #1 handicap hole, and for good reason. The fairway ahead slopes strongly right to left. Take aim at the sloping hills that border the fairway right or, for those who prefer a fade, start shaping your shot from the rock on the left side of the fairway. You will be hitting uphill to a well-protected green where there is a rock cropping to the left, an arroyo that creeps along the right side of the green, and, for good measure, a bunker just short and right. The approach tends to play a little longer than marked. If you’re lucky enough to find yourself on in two, well, a tricky undulating green is anything but security for par.Click the image to enlarge
|
|
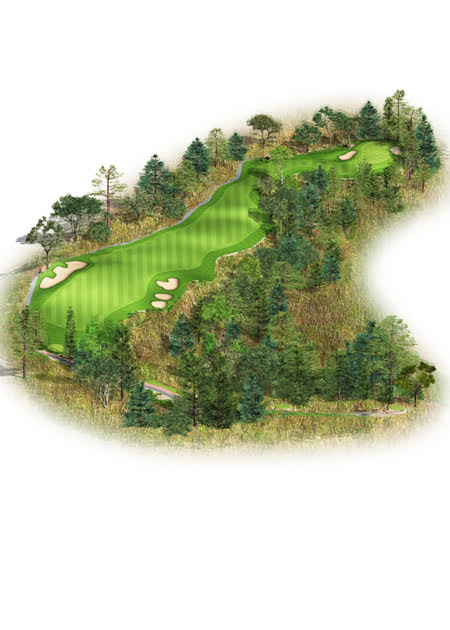
Hole 7 Par 4 |
“Challenge Met” |
 This slightly uphill Par 4 is a good birdie opportunity. Any tee shot that finds the fairway leaves an open approach shot to the green. Though the green is protected by an unpredictable arroyo on the right and bunkers short of the green, proper club selection should have you safely on, putting for birdie. The smart play is a little long on the approach shot. Any shot in the middle front might not hang on and may find the arroyo. Hit it long and your ball may find the center of the green. This slightly uphill Par 4 is a good birdie opportunity. Any tee shot that finds the fairway leaves an open approach shot to the green. Though the green is protected by an unpredictable arroyo on the right and bunkers short of the green, proper club selection should have you safely on, putting for birdie. The smart play is a little long on the approach shot. Any shot in the middle front might not hang on and may find the arroyo. Hit it long and your ball may find the center of the green.Click the image to enlarge
|
|
Hole 8 Par 5 |
“Blessing Of The Bear” |
 The third Par 5 on the front side is the easiest on the course. A long drive down the right side of the fairway will give you the chance to reach in two. The long front-to-back green invites you to swing away, but be cautious of the two bunkers right of the green. Best chance at eagle on the entire course. The third Par 5 on the front side is the easiest on the course. A long drive down the right side of the fairway will give you the chance to reach in two. The long front-to-back green invites you to swing away, but be cautious of the two bunkers right of the green. Best chance at eagle on the entire course.Click the image to enlarge
|
|
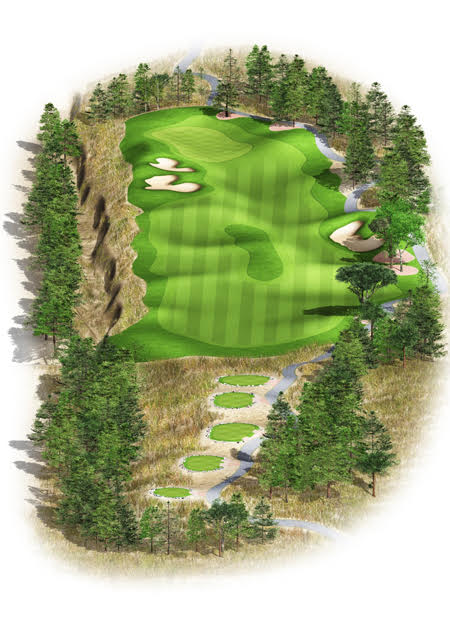
Hole 9 Par 3 |
“Enemies Past” |
 Proper club selection can be challenging on the Par 3 ninth. No matter the pin location, a play to the middle of the green is useful. Three bunkers above the back of the green punish those who hit it too long. Proper club selection can be challenging on the Par 3 ninth. No matter the pin location, a play to the middle of the green is useful. Three bunkers above the back of the green punish those who hit it too long.Click the image to enlarge |
|
Hole 10 Par 4 |
“Two Ravens” |
 After the turn, there is a chance to make birdie on this short Par 4. This rolling fairway is easy to find, but make sure you choose enough club for your second. The green slopes from back to front and provides good relief for most shots missed to the right. After the turn, there is a chance to make birdie on this short Par 4. This rolling fairway is easy to find, but make sure you choose enough club for your second. The green slopes from back to front and provides good relief for most shots missed to the right.Click the image to enlarge
|
|
Hole 11 Par 3 |
“Widow Maker” |
 Swirling winds and a steep green make the right club as important as the right swing on this Par 3. It’s important not to be shy here; all the danger is short and the back drop will help long tee shots come off the hill towards the green. This green yields the most holes-in-one when the pin is up front. Swirling winds and a steep green make the right club as important as the right swing on this Par 3. It’s important not to be shy here; all the danger is short and the back drop will help long tee shots come off the hill towards the green. This green yields the most holes-in-one when the pin is up front.Click the image to enlarge
|
|
Hole 12 Par 4 |
“Iron That Walks” |
 The ideal tee shot on this uphill Par 4 is just right of the last of the bunkers that line this fairway on the left. The putting surface is large, presenting a great chance for birdie after a carefully placed first shot. So swing away. The ideal tee shot on this uphill Par 4 is just right of the last of the bunkers that line this fairway on the left. The putting surface is large, presenting a great chance for birdie after a carefully placed first shot. So swing away.Click the image to enlarge
|
|
Hole 13 Par 4 |
“In Victory I Stand” |
 Another Par 4 that requires an accurate drive. Aim just right of the left-hand bunker, and you’ll have a clear approach shot onto a spacious green that slopes uphill front to back, making this hole another scoring opportunity. Another Par 4 that requires an accurate drive. Aim just right of the left-hand bunker, and you’ll have a clear approach shot onto a spacious green that slopes uphill front to back, making this hole another scoring opportunity.Click the image to enlarge |
|
Hole 14 Par 5 |
“Long Soldier” |
 Another Par 5 that requires an accurate drive. Aim just right of the left-hand bunker, but steer clear of the tall Ponderosa pine With a well-placed drive, you will have a clear approach shot onto a spacious green that slopes uphill front to back. Another eagle possibility. Another Par 5 that requires an accurate drive. Aim just right of the left-hand bunker, but steer clear of the tall Ponderosa pine With a well-placed drive, you will have a clear approach shot onto a spacious green that slopes uphill front to back. Another eagle possibility.Click the image to enlarge
|
|
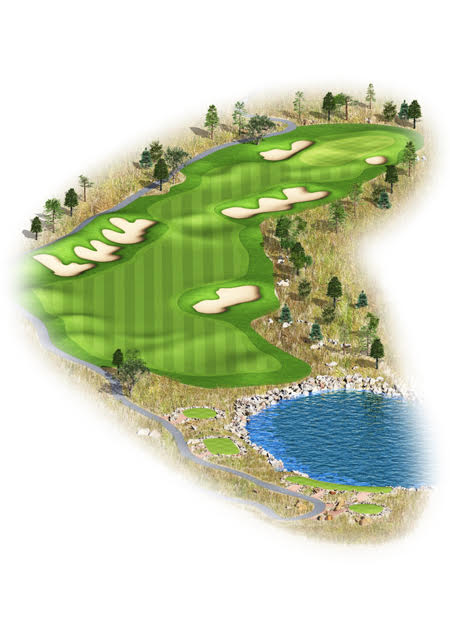
Hole 15 Par 3 |
“The War Chiefs’ Treasure” |
 Protected by water on the right and bunkers on the left, this Par 3 is long and challenging. The relatively flat green rewards those who make their way on. Think positive and put it on. Protected by water on the right and bunkers on the left, this Par 3 is long and challenging. The relatively flat green rewards those who make their way on. Think positive and put it on.Click the image to enlarge |
|
Hole 16 Par 4 |
“Retired With Honors” |
 You may be tempted to go for it downwind and downhill, but the smart play is actually a mid-iron or fairway wood from the tee. This allows you to dial in your approach shot and stick it close to the pin. You may be tempted to go for it downwind and downhill, but the smart play is actually a mid-iron or fairway wood from the tee. This allows you to dial in your approach shot and stick it close to the pin.Click the image to enlarge |
|
Hole 17 Par 3 |
“Touch The Clouds |
 This is the shortest Par 3 on the course. Again, the wind will be your biggest opponent. This green sits on a plateau but is fairly friendly. This is the shortest Par 3 on the course. Again, the wind will be your biggest opponent. This green sits on a plateau but is fairly friendly.Click the image to enlarge |
|
Hole 18 Par 5 |
“Memoirs Of Honor” |
 This Par 5 rewards a good drive offers a great chance to make birdie on the last hole. The tee shot must clear the ravine to have a chance for a lay up. The big hitter can attempt to cut as much of the dogleg as they feel confident with and attempt to go for the green in two. If you choose to lay up, leave yourself a short iron in; this green is there for the taking. Bunkers on both sides guard the green, which slopes gently to the right. A birdie here will give you something to talk about in the clubhouse. This Par 5 rewards a good drive offers a great chance to make birdie on the last hole. The tee shot must clear the ravine to have a chance for a lay up. The big hitter can attempt to cut as much of the dogleg as they feel confident with and attempt to go for the green in two. If you choose to lay up, leave yourself a short iron in; this green is there for the taking. Bunkers on both sides guard the green, which slopes gently to the right. A birdie here will give you something to talk about in the clubhouse.Click the image to enlarge
|